There is always this moment of excitement, appreciation, and respect when someone looks at a manual focus lens. The rings, numbers, and lines communicate control while demanding a certain amount of skill. A well designed, manual lens is a piece of beauty, like a jewelry or a precise tool (which it is). In recent years lens design has led to visually simplified lens constructions. Autofocus and viewfinder focus-confirmation have eliminated the need for manual controls. While photographers can still switch to manual focus, they often don’t have any focus lines printed on the barrels anymore. You still find distance indicators in feet and meters but most of them don’t get used anymore. I remember when I grew up and I used a Rollei 35TE. Guessing the distance and setting it on the lens was standard. You had to estimate how far an object was positioned from the camera and you had to dial that in. Even setting the aperture on the lens is not common anymore. Most SLRs provide aperture control via dials on the camera body. While this works well for professional photographers that use cameras on a daily basis you see lots of casual camera owners searching for the right button that allows them to change the aperture. The physical disconnect of the control to the lens has made this an unintuitive procedure. No wonder that some users have given up on manual controls on DSLRs and just keep their cameras on full automation. In recent years we have witnessed a renaissance of manual lenses. The introduction of the digital Leica M and the new crops of mirror-less, interchangeable lens cameras have opened up the door to manual and old lenses again. Adapters allow photographers to connect a wide array of new and vintage glass to their cameras. Seeing a Voigtländer, Zeiss, or Leica lens on a Sony NEX just looks cool. It says ‘Compact-Pro’.
A few weeks ago a friend of mine had just purchased a Nex-5 plus a Voigtländer lens. He asked me about the lines on his manual lens. I realized that many users have never used focus lines before. I will try to explain how it works and you may discover a trick that will get you to faster and better focused images in certain situations. This part now is for those who have not used a manual lens before. Experts can stop reading right here and use their time to take some great shots outside.
The two things that you have to set on a manual lens is the focus and the aperture. I could write an entire new entry about setting the aperture but right now I assume that you know how to do it and how you have to find the right balance of shutter speed, aperture and ISO for your artistic expression. One thing to keep in mind: as more open the lens as more accurately you have to set the focus because the focus field gets tighter. More later on. Setting the focus usually happens in the viewfinder or more and more often on the camera screen. Zoom-in features have made it easier to find the accurate focus point, still it can take a few seconds to get it right while missing the decisive moment.
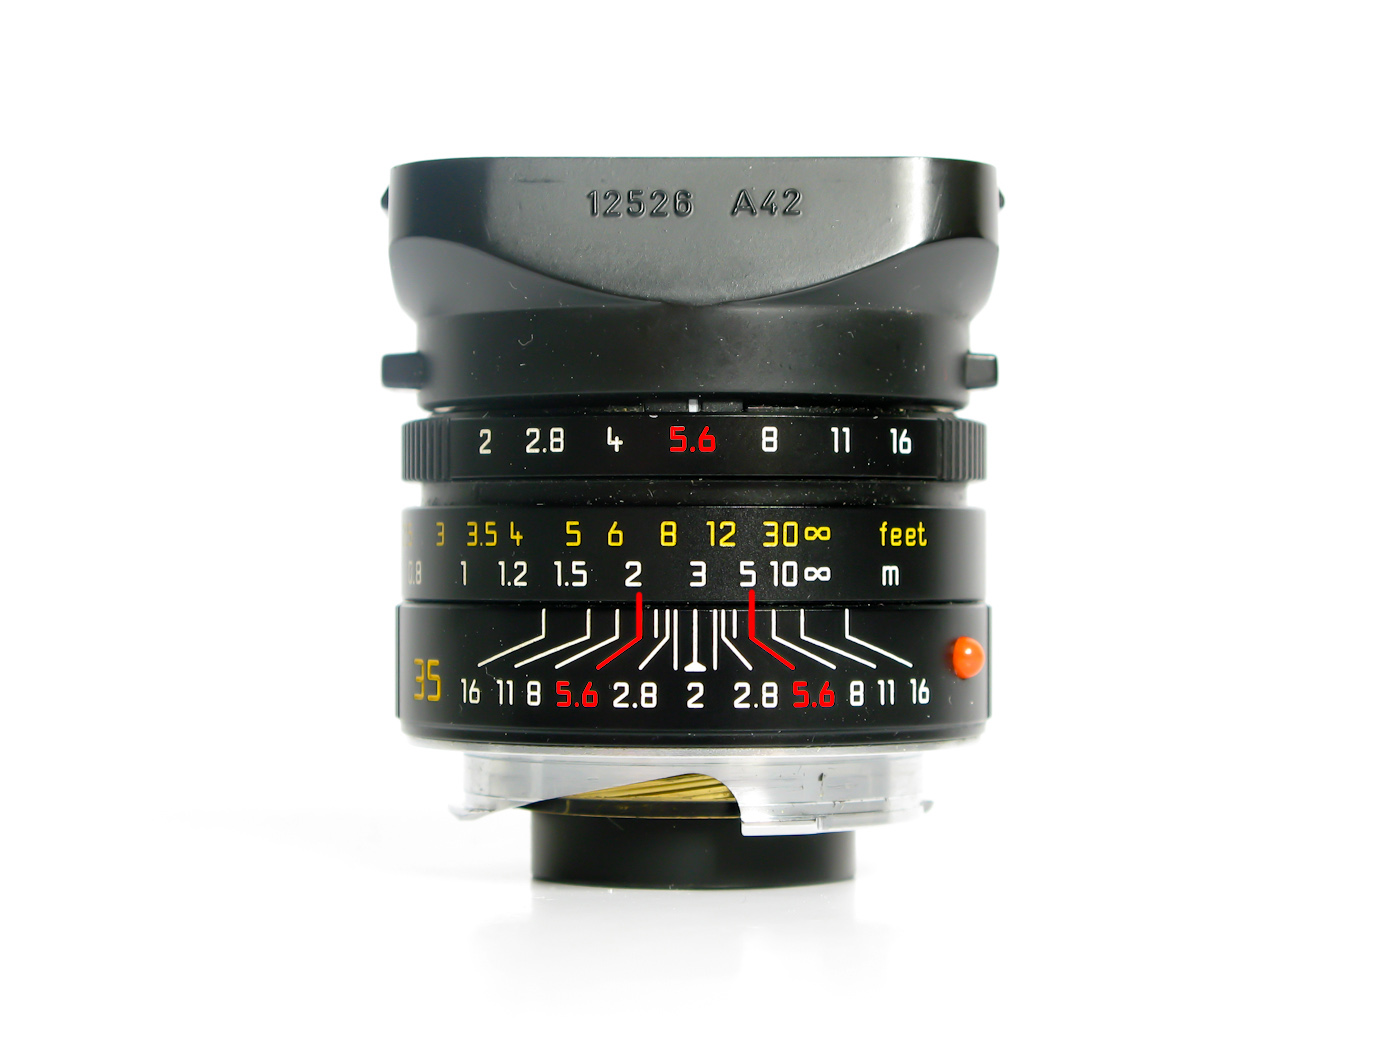
Ok, I will keep this part short to make it easier to absorb. I am using a Leica 35mm Summicron lens for this exercise. There are three printed areas on this lens. All the way on top you have the aperture setting. This ring moves from F2 to f16 with clicks at every half step. The next is the focus ring. This one moves smoothly between the closest focus distance of 0.7 meter and infinity (the sleeping 8 symbol).
Closest to the camera body you will see the focus lines for zone focusing. I am actually not sure if the terminology is correct but lets call them that way for now.
The lens is set to f2, wide open aperture, and focused at 3 meter. At f2 the depth-of-field (DOF) is very shallow. DOF is the distance from the closest to the farthest point that are still sharp at that aperture. If you step down the aperture to f5.6. f8, or f11 the distance between these two points increases. Ansel Adams once was part of the photographer group f64. They used f64 to get total focus from front to infinity with their view cameras.
So at f2 there is one line of the zone focusing scale. I colorized and extended the relevant line for illustration purpose. Whatever you focus at, the line in the center with the number 2 is the reference line for the focus. You can focus on a screen or through a view finder, if you look at the lens the number above the line with the 2 will show you the current focus distance. Here the focus is at 3 meters and the DOF is very shallow, just a few centimeters.
Now I stop down the lens to f5.6. The DOF increases and on the zone focus scale you see two lines with f5.6. This space between the two lines illustrates the DOF, the area that is still in focus. You can read the closest and the farthest point of the DOF right of the focus ring.Focus starts right around 2 meters and fades out at around 5 meters.
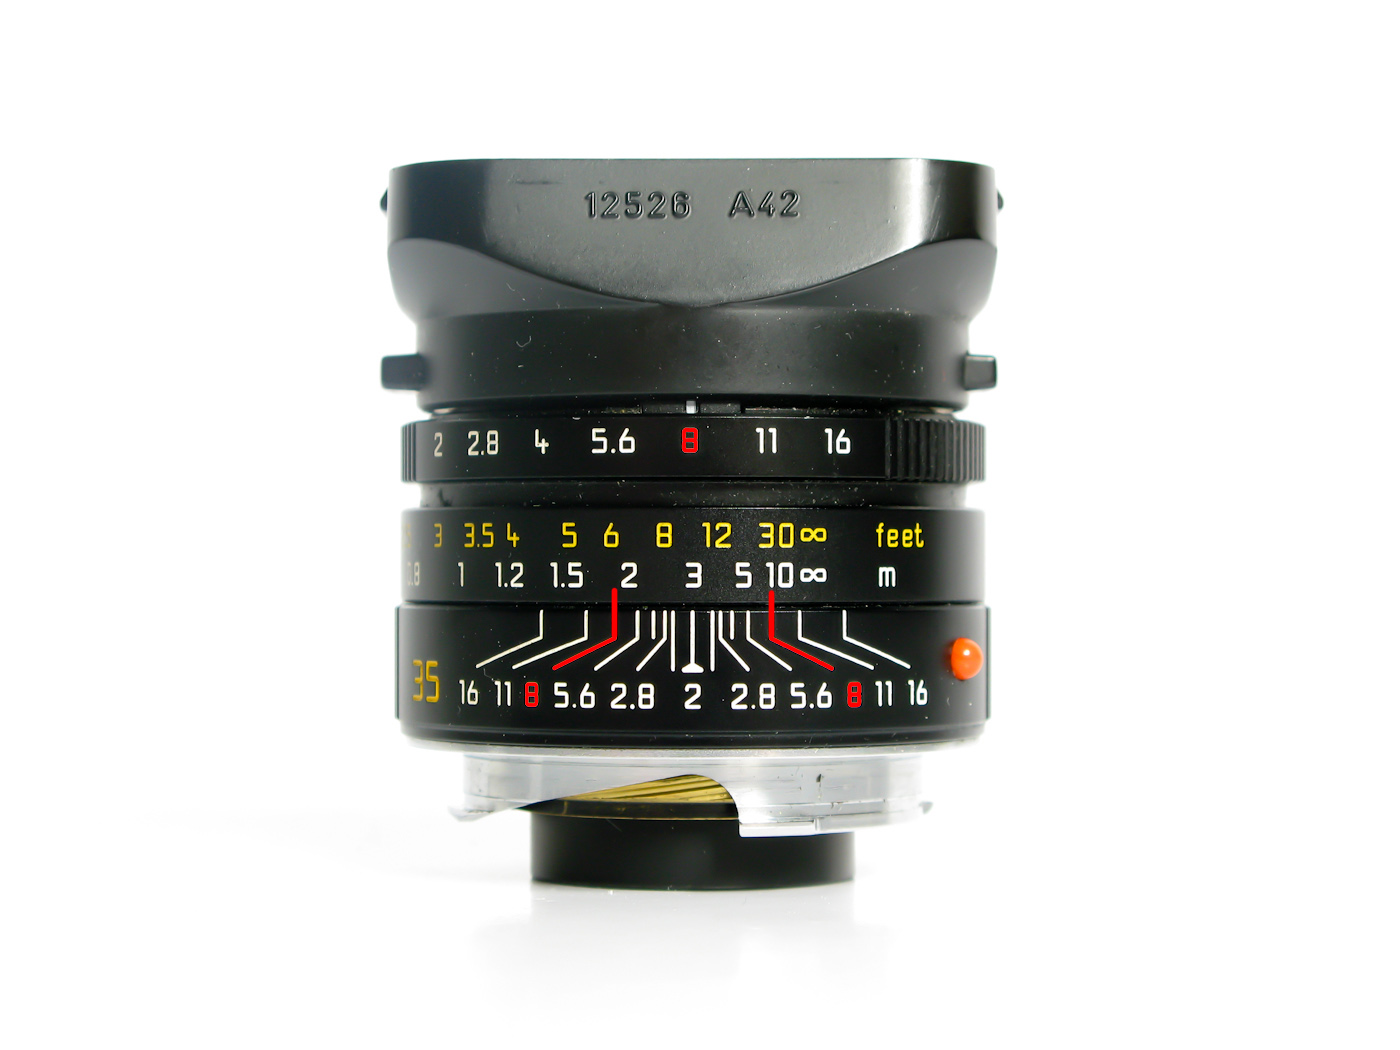
I stop further down the aperture to f8. My main focus point is still at 3 meters but when we check the lines they indicate that the focus already starts right under 2 meters and fades out at around 8 meters. That is already a window of sharp focus of around 6 meters (between 2-8 meter).
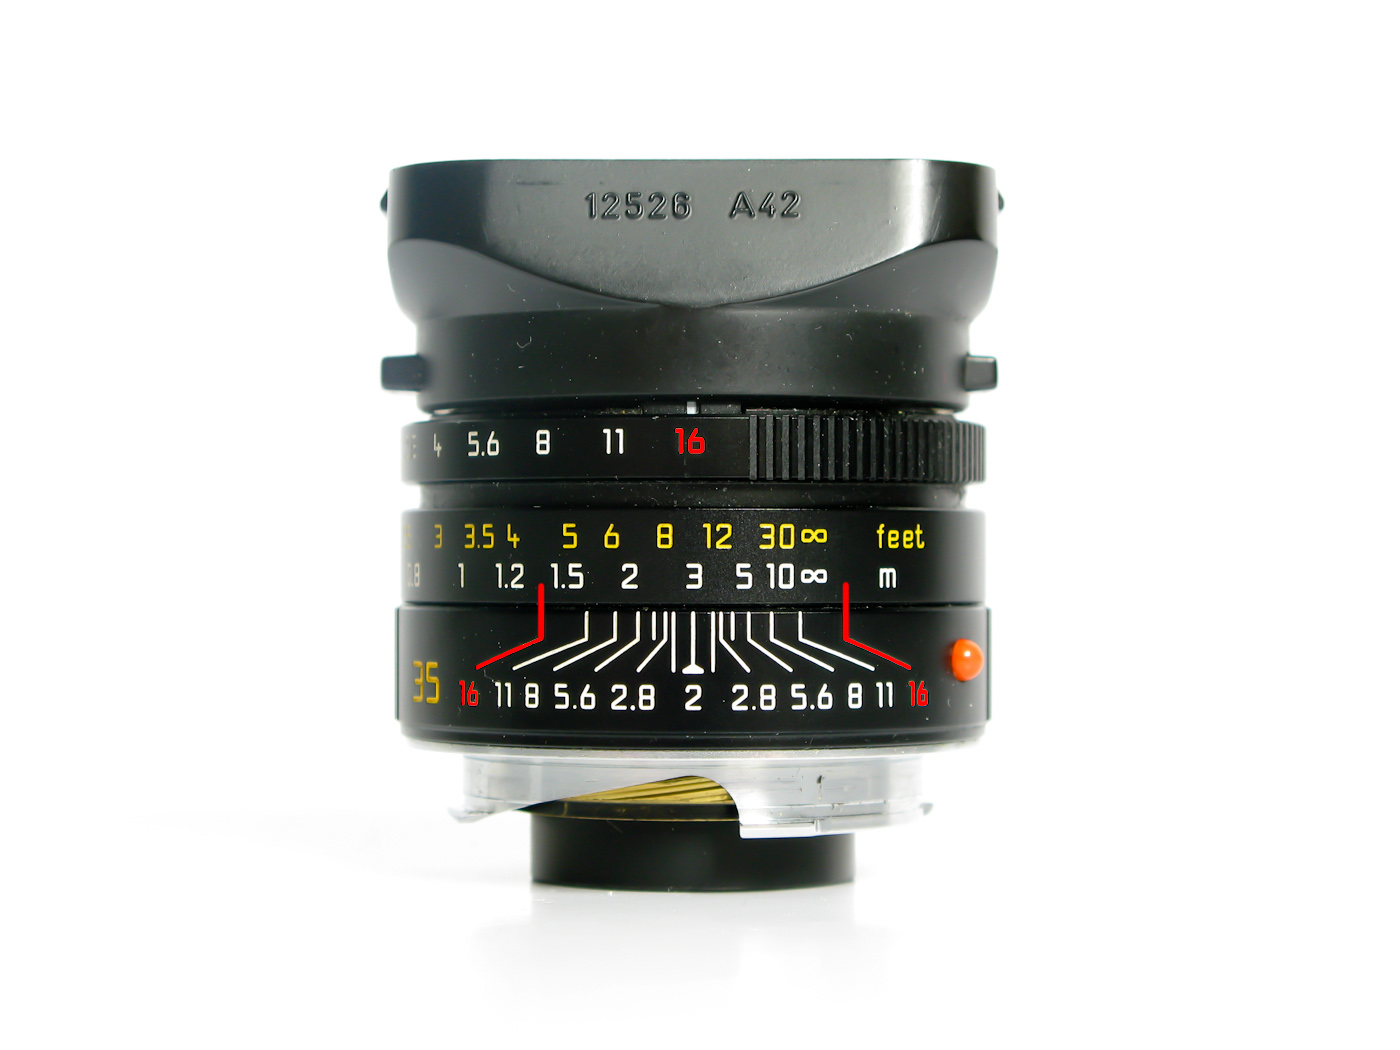
I still keep the focus ring untouched but stop down the aperture to f16. Now the DOF is from around 1.3 meter all the way to infinity.
Ok, so if we leave it at f16 we will always get sharp images. Great, but not really. Many lenses have their focus peak at f5.6, f8. At f16 you may loose overall image quality. Low light may not even allow you to use such a small aperture.
Reading the DOF from the zone focus scale can be useful in many situations. Here are two.
1. As a street photographer I want to be quick without wasting time by finding the right focus. Many street photographers pre-set the zone focus. Lets assume we set the lens to f8 again. My focus will be sharp between 2 and around 8 meters. A photographer can now walk around and whenever a good object shows up he or she just needs to raise the camera and press the shutter. As long as the object is between 2 and 8 meters it will be in focus. If the object is closer than 2 meters or farther away than 8 meters, the photographer moves so the object is within the DOF. This technique completely eliminates the need to focus while aiming at an object. It can be faster than autofocus and it allows the photographer to fully care about the composition.
2. Lets keep the setting from the image above and lets assume I am taking a photo of a person that is 3 meters way. An old church in the background is not in focus because it is 20 meters away. Too far for my DOF. What I can do is move the focus ring so the 3 of the focus ring is just within the two red lines for f8. As long as the 3 meter is within the red lines it will be in focus. What happened is that by moving the the 3 just to the beginning of my DOF I moved the infinity into the DOF as well. Now my DOF is from 3 meter to infinity, just right to have the person and the church in focus.
These techniques work really well on wide angle lenses. With higher focal-length lenses the lines are getting tighter and the use of the scales becomes more difficult. But with wider lenses the space between the zone lines increases, making them a useful tool for any photographer. Now go and use your kit lens as a paper weight and get something real. D!RK
PS As always, test your equipment. The results may vary between lens manufacturers (focus starts gradually and it is up t the manufacturers interpretation when an object is in focus) and between film and digital. In critical situations just use a one f stop tighter readout.

Great article. I really never even looked into that useful feature. Curious if this can speed me up here or there.
I’m impressed by your wiritng. Are you a professional or just very knowledgeable?
Hi Beth. Thank you. I am neither knowledgable nor a professional. I just like to take photos. D!RK
Excellent article – finally i get it! Thanks! 🙂
nice. great illustrations.
Just bought an M and this article has helped a lot. Thank you so very much.
Excellent Article!! You have a way of explaining it in a very simple manner. Keep writing!!!
Great article! This is exactly the explanation I was looking for.
Informative article!!! This is exactly what I needed to learn this concept!!! Thanks for sharing!!!!
Hey thanks for your article! It was very useful. I am still getting used to the sony A7ii / voigtlander 35mm f1.4 setup I got not long ago. Tbh I haven’t been overly happy with the results I have got from it. Not sure what it is but the colours and images that come out don’t excite me more than my olympus mju ii which is kinda ridiculous considering the price difference. Anyway thanks!
Hi,
Thanks for this article. I use this technique with my Leica MP a lot on the streets.
Do you have experience with digital cameras and manual leica lenses with this technique? I’m gonna to buy Sony A7ii and use it with my leica lenses, but I’m not sure if DOF scale will work as on my Leica body. Thanks for your thoughts.
hi Paul
i use manual lenses on my SL. it works similar to what you do already. like mentioned int he article, test it for few scenarios out in the street. all the bese
Kannan
Thanks for making something I had hitherto been unable to grasp so understandable!